Jump to content

Photo

Animation Made Simple


  • Please log in to reply
4 replies to this topic

#1 Harmony Havoc

Harmony Havoc

    Girls Love Metallica Best

  • Cover Artists
  • 712 posts
  • Favorite Album:They all kick ass!

Posted 13 March 2005 - 06:40 PM

Animation

Animation appears to be very complex, but when broken down to it's components can be very simple. There are zillions of tutorials out there demonstrating how to animate just about anything. Good Tutorials is an excellent source to find animation tutorials. This thread will start off with some basic simple animation and as it develops, it will demonstrate some of the more complex animation techniques. For a peek at things to come check out these Animation Tutorials

Simple Animation

The key to this technique is placing an object in a starting position on one frame, making a second frame with an ending point and tweeing between the two frames. Basic animation is simple using the following steps. For a detailed explanation using screenshots of each of the steps use This Simple Animation Tutorial by Ace.

1. Open a new document with a white background. Rename the background as layer One.
2. Open a second layer; add a picture or an object.
3. Open the document in Image Ready.
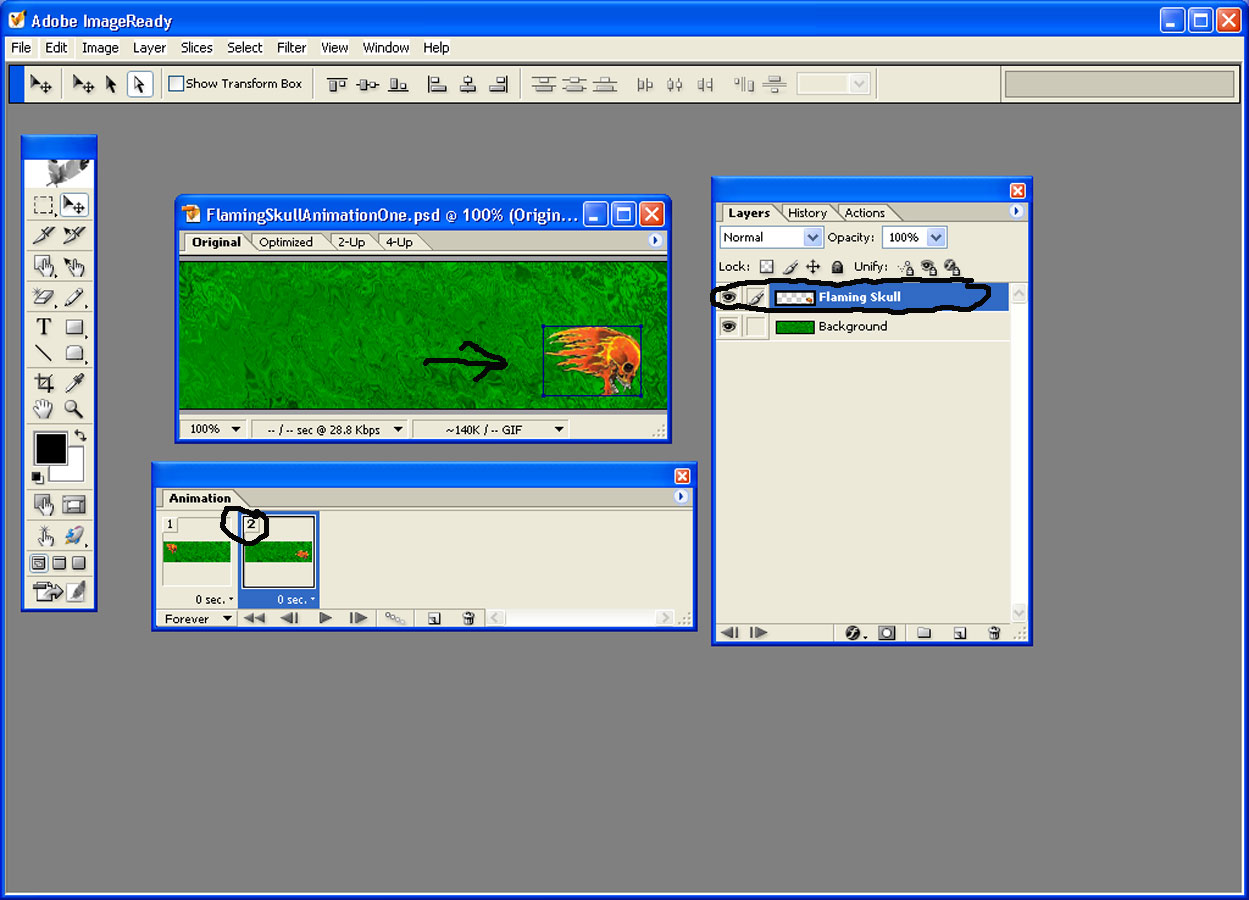
4. Using the Animation Tool Box, open the second frame.
5. In the First Frame place your object in the starting position.
6. In the Second Frame place your object in the ending position.
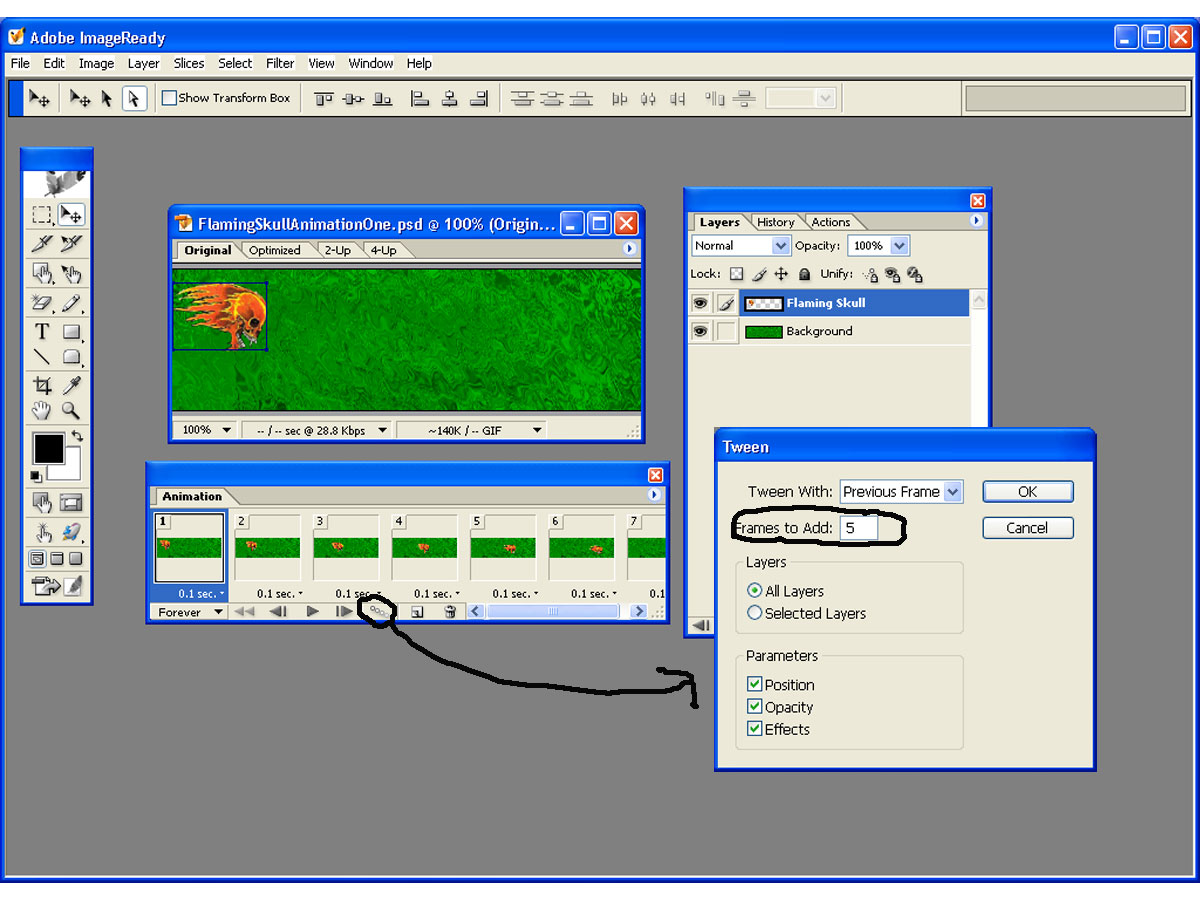
7. Use the Tween button to create the animation between the two frames.
8. Save the Image Ready document as Optimized.

The Results should look like this:

Posted Image

The following screenshots illustrating how the technique was applied to make the skull move across the page.

Frame one with the skull in the starting position: FlamingSkullAnimationOne
Frame two with the skull in the ending position: FlamingSkullAnimationTwo
Using the tween button with 5 frames the starting and ending positions: FlamingSkullAnimationThree

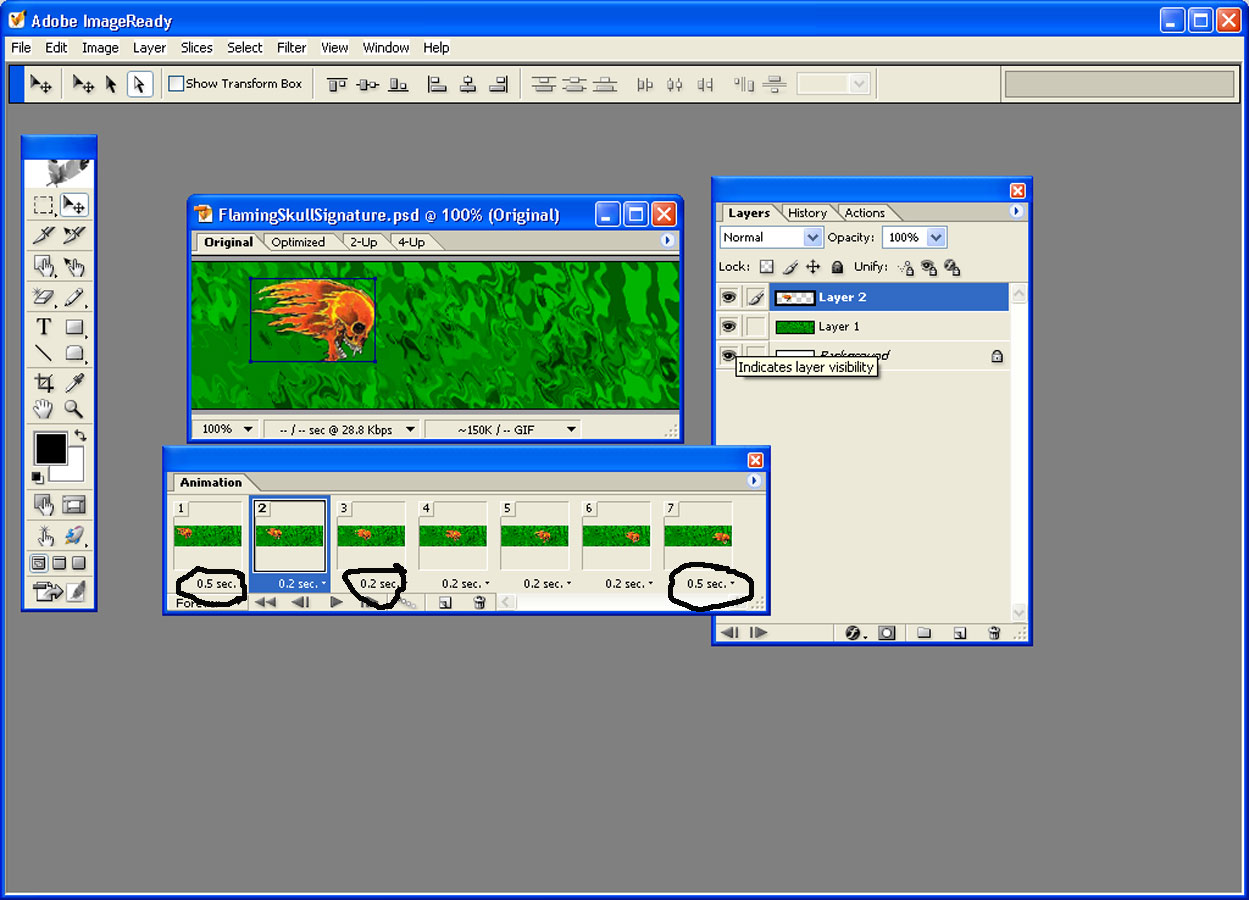
By adjusting the times at the bottom of each frame, the speed of animation can be altered. In the flaming skull animation all the times were set to .01 seconds. In the image below the time on the starting and ending frames were set to .05 seconds with the tweeing frames set to .02 seconds.

Posted Image

This screenshot demonstrates the change in timing: FlamingSkullAnimationFour

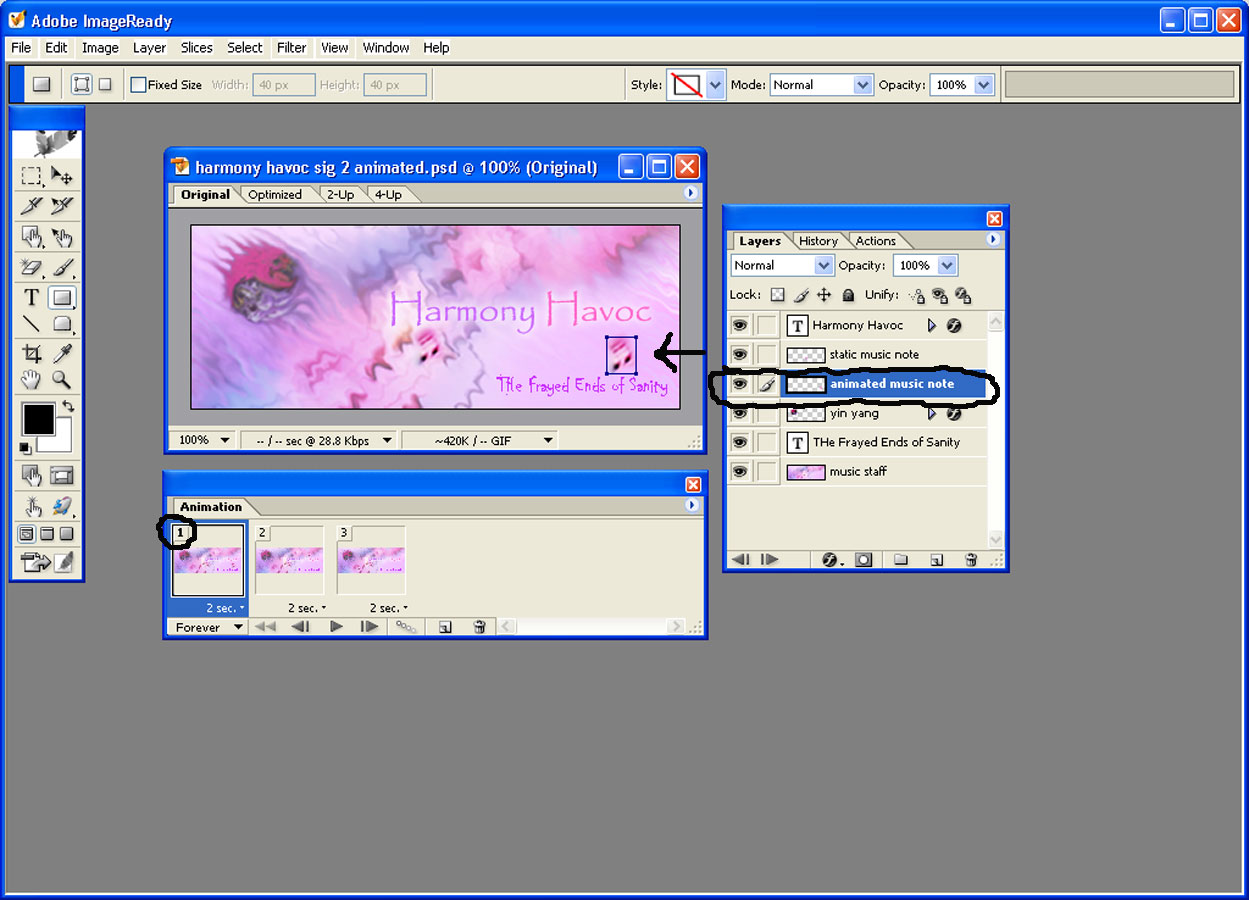
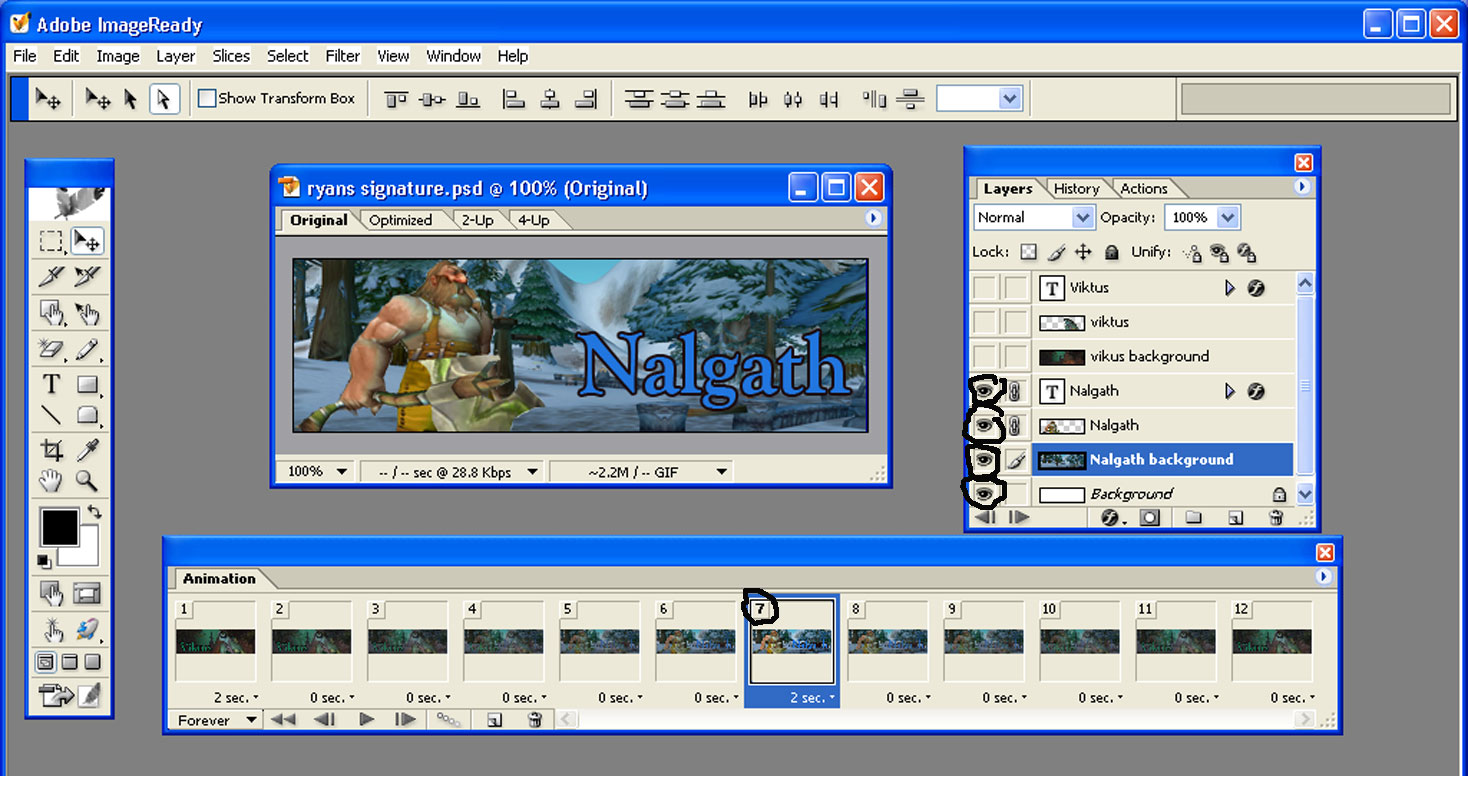
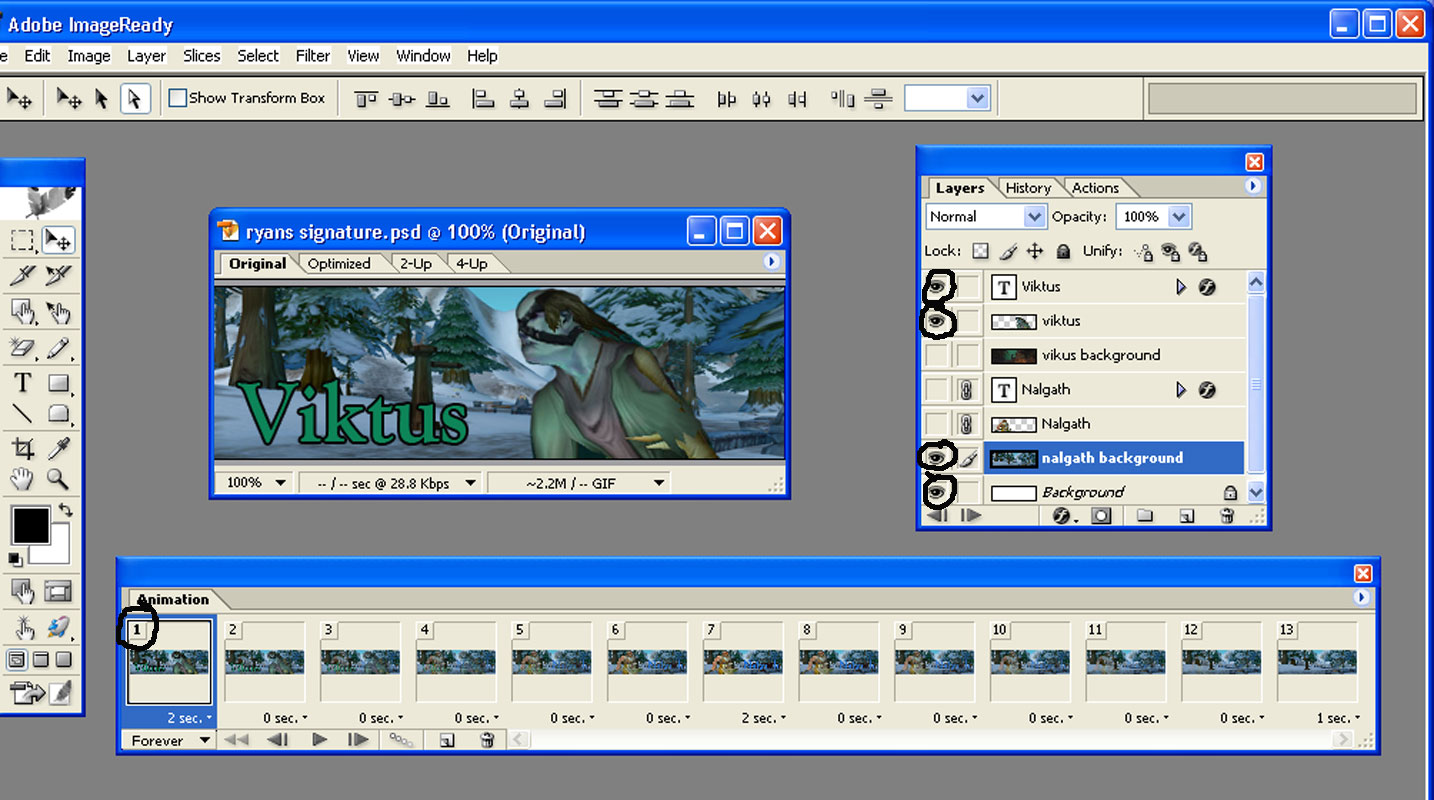
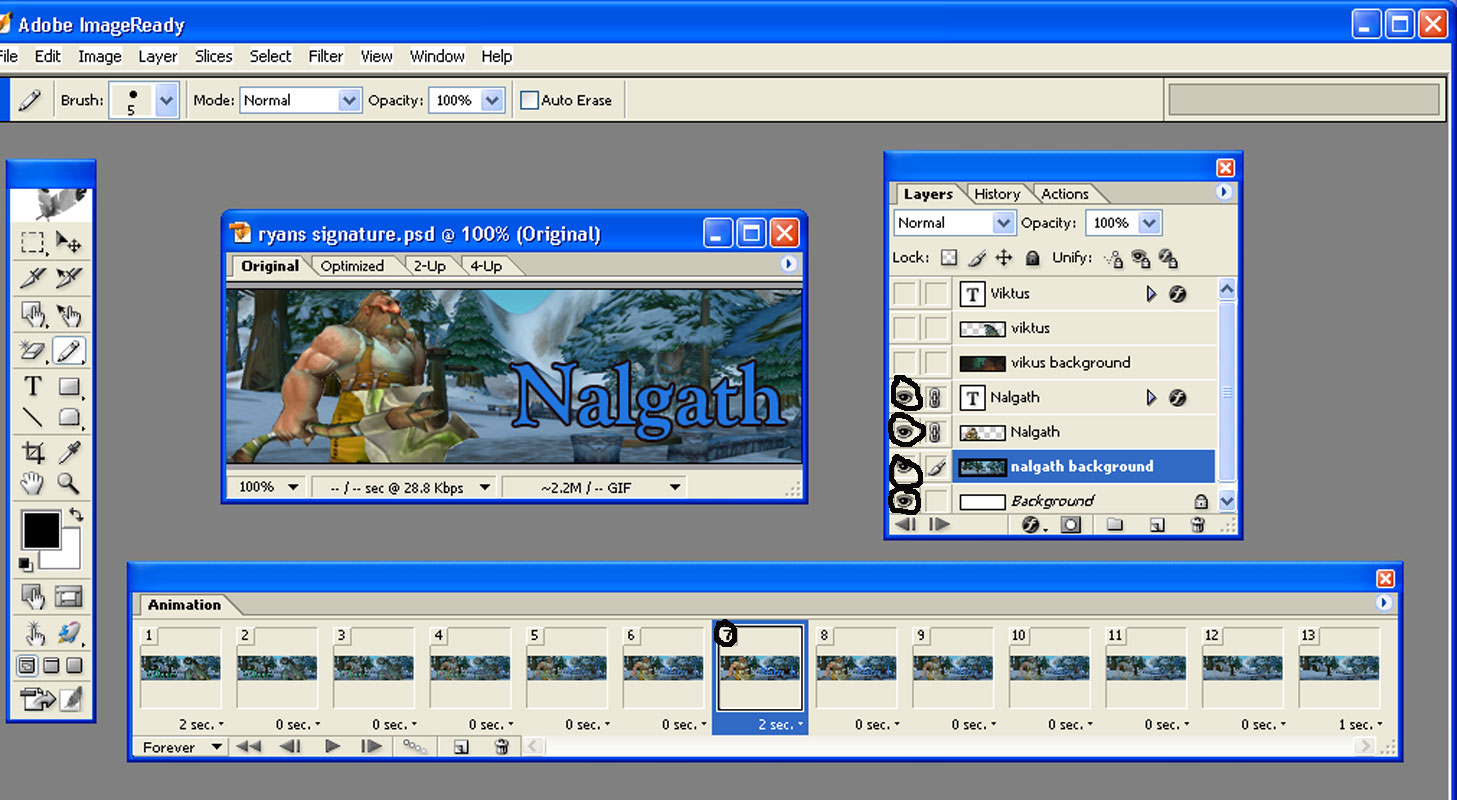
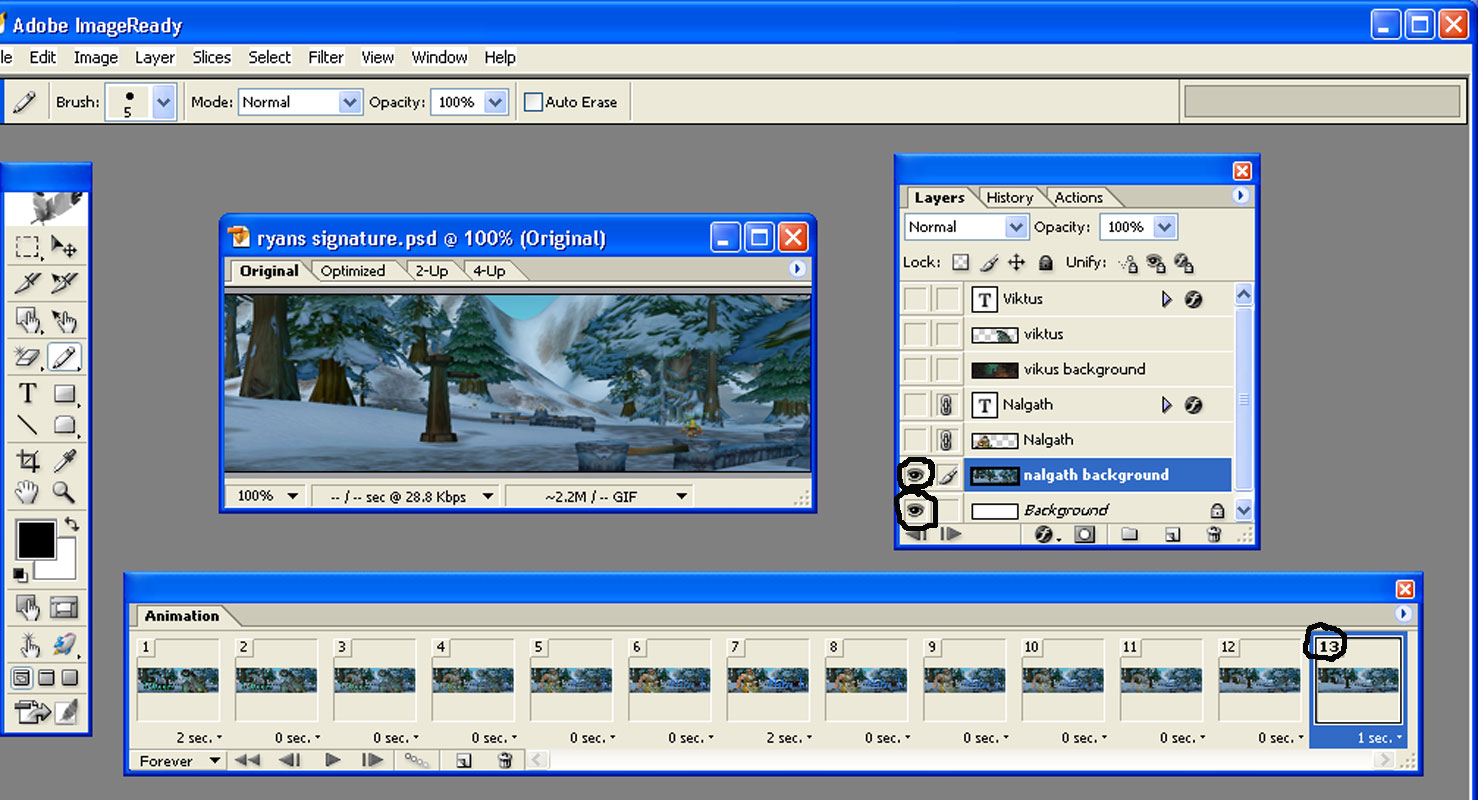
A variation on this technique can be used to make the same object blinks in different positions without the tweening effect as it moves. Three frames were used to position the object in three different places in the design. The tweening button was not used so that the effect created is that the object is blinking between different frames as illustrated in this image:

Posted Image

These screenshots illustrate how this technique was altered to make the music note blink in different positions in the signature.
Frame one with the music note in position one: HHSimpleAnimationOne
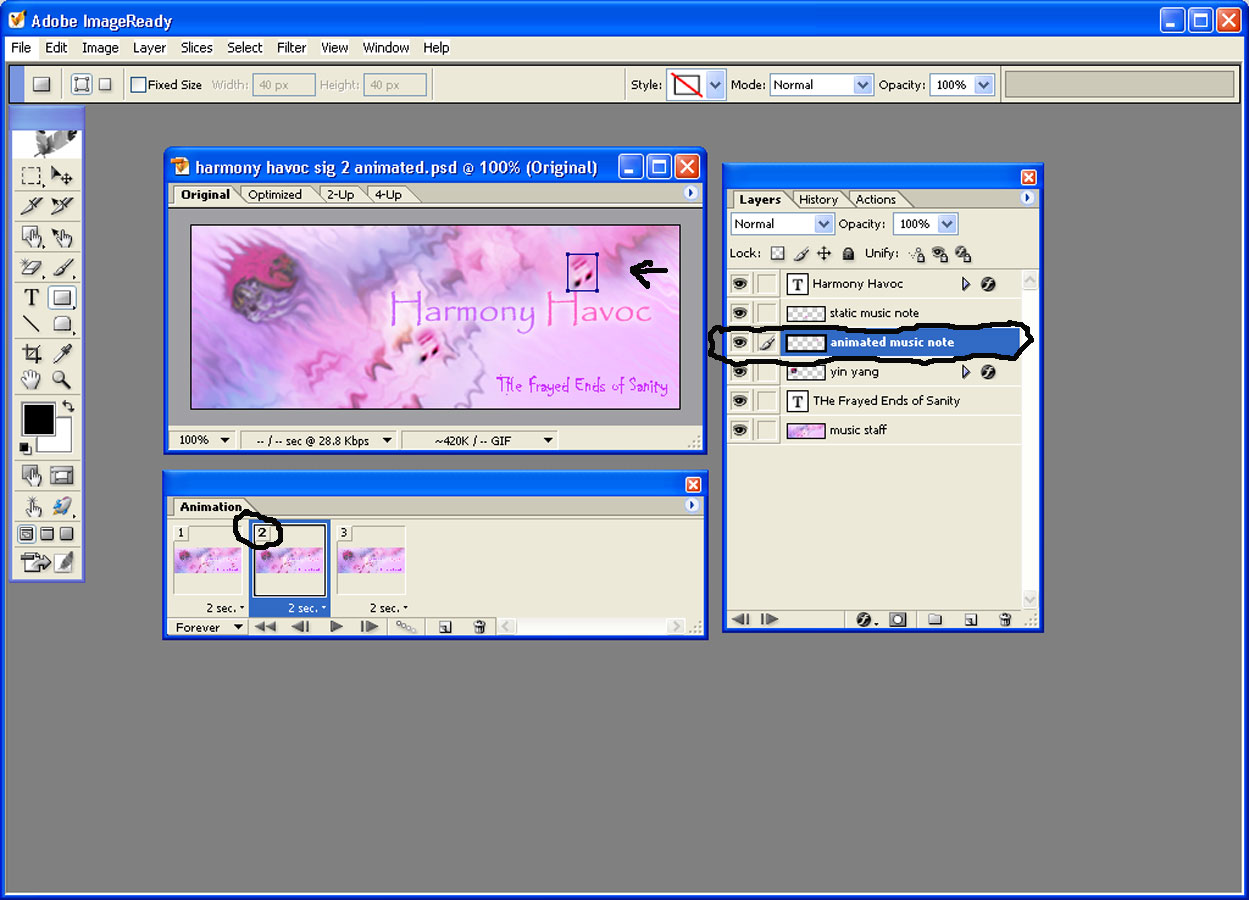
Frame two with the music note in position two: HHSimpleAnimationTwo
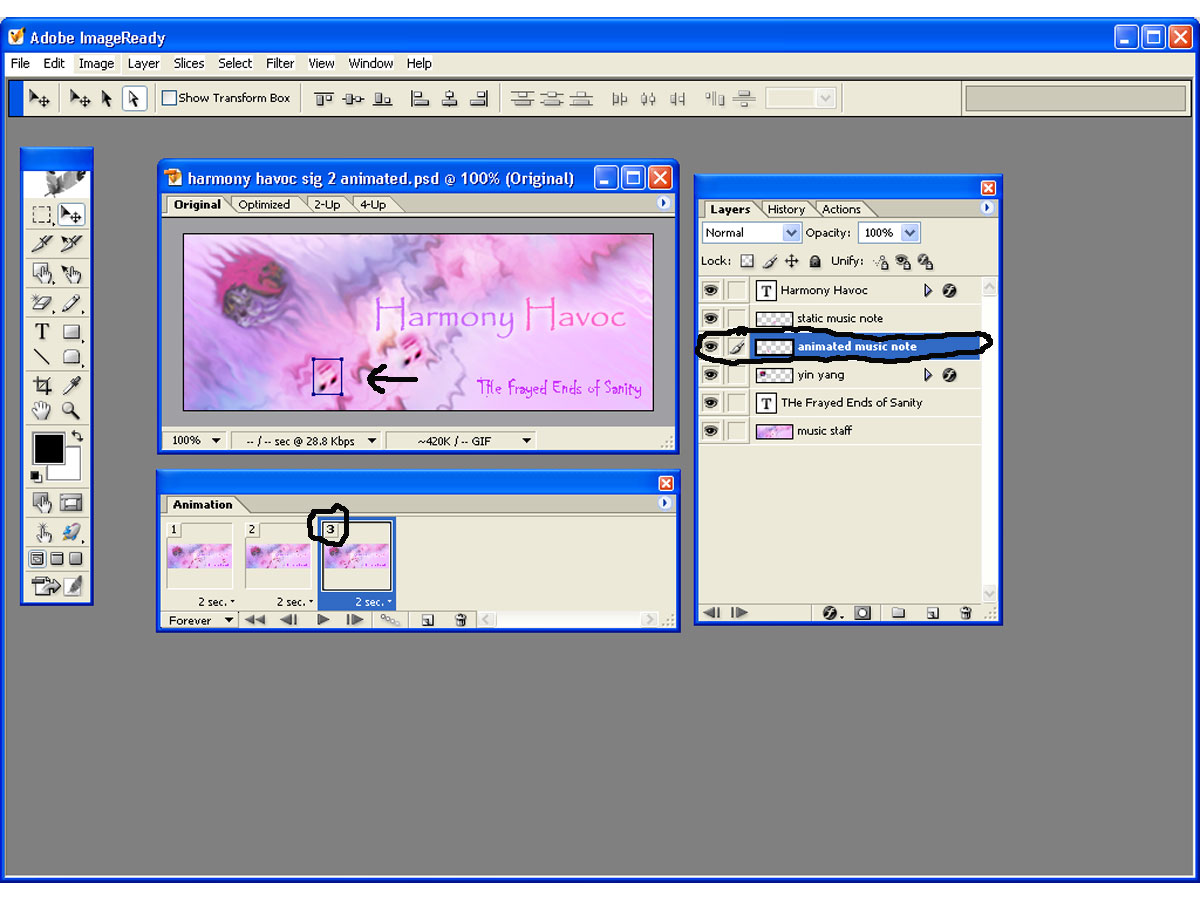
Frame three with the music note in position three: HHSimpleAnimationThree

#2 Harmony Havoc

Harmony Havoc

    Girls Love Metallica Best

  • Cover Artists
  • 712 posts
  • Favorite Album:They all kick ass!

Posted 20 March 2005 - 07:33 AM

Morphing Between Different Images

This Tutorial by Barbos explains in detail the following steps used to morph between two images.

The first two steps can be done in Photoshop and sent to Image Ready or just done in Image Ready itself as described in the tutorial.

1. Open up a new document. Paste an image into this layer
2. Create a 2nd layer with another image.
3. In Image Ready, open the Animation Pallet, making frame one be layer one.
4. Open a second frame with the alternate image.
5. Use the Tween button two images to add the necessary frames to create the morphing as show in the image below:

Posted Image

The morphing images in this “signature” were created in Photoshop, each consisting of several different layers, before being sent to Image Ready. The screenshots demonstrate how to build the images to be morphed in the frames by turning on and off various layers, using the open/closed eyeball icon. The tweening button was used to add five layers between the morphing frames (1 and 7). The two morphing frames are set to hold for 2 seconds each with the tweeing frames set for no delay (0 seconds).

screenshot One
screenshot Two

Here is a variation of this signature using a consistent background while morphing between three frames; two containing the characters and the text layers; with the third layer being the background only.

Posted Image


The screenshots demonstrate how the images in each frame to be morphed (1, 7, 13) were built by selecting the various layers. The two frames containing the characters were held for 2 seconds, the background frame was held for 1 second and the tweening frames set for no delay. There was no tweening between the background frame and the first image frame to create a jumping at you effect. If a smooth morph between the two is desired, use the tweening button to tweening layers between the two frames.

screenshot One
screenshot Two
screenshot Three

There is an unlimited number of effects that can be created using this simple technique by experimenting with the number of frames to be morphed between; the layers used in each frame; the number of frames to be used in tweening between the image frames; and the timing. Play and be creative!!!

#3 Harmony Havoc

Harmony Havoc

    Girls Love Metallica Best

  • Cover Artists
  • 712 posts
  • Favorite Album:They all kick ass!

Posted 11 August 2005 - 03:46 AM

Very Cool Very Simple Animation

I haven't tried this yet, but this is a great tutorial for animation. Check it out:

Very Cool Animation

#4 Harmony Havoc

Harmony Havoc

    Girls Love Metallica Best

  • Cover Artists
  • 712 posts
  • Favorite Album:They all kick ass!

Posted 08 September 2005 - 03:55 AM

Another Great Animation Tutorial

This Video Tutorial reviews some of the techniques described in the 1st post above but using them in a different application. This tutorial is a really good one, with which you can make an image such as this:

Posted Image

Note: if you do not have the latest version of Photoshop and cannot access the Animation Pallet from the "window" drop down in Photoshop, transfer your image to Image Ready and follow the rest of the tutorial while in Image Ready.

#5 Harmony Havoc

Harmony Havoc

    Girls Love Metallica Best

  • Cover Artists
  • 712 posts
  • Favorite Album:They all kick ass!

Posted 13 November 2005 - 01:31 AM

I was browsing through Good Tutorials for inspiration and looking for background ideas when I came across a tutorial by shaneomack on how to created An animation that allows you to have a two sided signatrue, that flips over. It was just way too cool and I had to make it. Here is my results:

Posted Image

Follow this Link for a more detailed version of shaneomack's directions including screenshots of the process.

1. Make a new document 370x135 and transparent. Make both sides of your sig in the same document and make sure both sides have a border. Then what your going to want to do is hide every layer on one side of the sig, then right click on one of the visible layers and hit merge visible. Now do the same for the other side. You should now only have 2 layers.
2. Now for the animation. In Photoshop pick the layer you want to be on the first side and duplicate it. Then hide the two layers other than the duplicated one. Now go to edit-transform-scale. Drag both sides 5 gray and white squares towards the middle
3. Now go to edit-transform-perspective. Drag the bottom right corner up 2 squares.
4. Duplicate that layer, hide the one you duplicated, and then do exactly what you did to the last layer. Once your done keep duplicating and transforming until you get a little slit. On the one before the slit your going to want to move both sides only 3 squares in.
5. Hide all of your first side layers and unhide your second side layer. Then duplicate it, hide the original, and transform it exactly the way you did the other ones except this time when you perspective, lift the left bottom corner two squares. Keep duplicating and transforming until you get 5 second side layers.(no slit layer)
6. Now you need to make layers turning the other way.
To do this you duplicate your original first side layer and then scale it the same way as always(5 squares towards the middle)but perspective the opposite side you did before.
7. THE HARD PART IS OVER! Ok now switch over to imageready. Make sure the animation window is open, if it's not go to window-animation. Keep hitting duplicate frame until you have 20 frames. Here's a link that will show you which layer should be visible in each frame.
http://img265.images...051517465ed.png
Make sure your first and eleventh frame are set to 3.5 sec and make sure your sixth and sixteenth frames are the slit.
Now save it and then go to save optimized and make sure it's a gif.
Posted Image


0 user(s) are reading this topic

0 members, 0 guests, 0 anonymous users