
Textures and Patterns
Mayang's Free Textures has 100s of free texture downloads for your use in your art work. Mayang's Free Textures
Good Tutorials is a site that a few of us here at MetCoverArt use for inspiration and instruction.
Here is a link for several tutorial to make various Textures and Patterns. There are instructions for some pretty awesome patterns and textures found in the links listed on this site such as: rocks, granite, wood grain, brushed metal, aged paper, grunge, marble, gold leaf, star field, chocolate, Kaleidoscope etc. etc.
As this thread develops, tutorials of similar textures will be grouped together and explained and examples of some of the more exceptional tetures will be posted.
If you cant find a tutorial for a specific texture, please post a reply in the tutorial request sticky. Thanks. :rock:
Textures and Patterns
Started by Harmony Havoc, May 23 2005 12:02 AM
8 replies to this topic
#1

Harmony Havoc
-
- Cover Artists
- 712 posts
Girls Love Metallica Best
- Favorite Album:They all kick ass!
Posted 23 May 2005 - 12:02 AM
#2
Harmony Havoc
-
- Cover Artists
- 712 posts
Girls Love Metallica Best
- Favorite Album:They all kick ass!
Posted 23 May 2005 - 12:07 AM
Blood, Slime, Goo, and Gunk
Want to make slime, blood, goo and gunk?
Check out these Good Tutorials dripping with instructions on how to make drips and drops.
Here are some various Good Tutorialsfor slime textures.
This Good Tutorials for some good textures that look like the goo in Nickelodeon logo.
Want to make slime, blood, goo and gunk?
Check out these Good Tutorials dripping with instructions on how to make drips and drops.
Here are some various Good Tutorialsfor slime textures.
This Good Tutorials for some good textures that look like the goo in Nickelodeon logo.
#3
Harmony Havoc
-
- Cover Artists
- 712 posts
Girls Love Metallica Best
- Favorite Album:They all kick ass!
Posted 25 May 2005 - 03:00 AM
Metal: Brushed, Chunky, Cracked, Damaged, Smooth
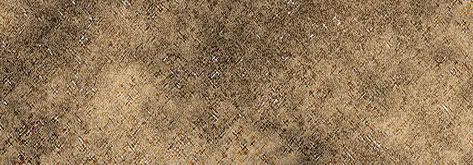
This chunky sand metal tutorial was made by following the steps in this Tutorial by Spoono.
1. Create a new layer and set its Blend Mode to Luminosity.
Press 'D,' then 'X,' then choose this color on your default swatches. (refer to image)
Go Filter>Render>Clouds until you get something you like.
Apply an Unsharp Mask by going Filter>Sharpen>Unsharp Mask with these settings:
Amount: 500
Radius: 7.2
Threshold: 0
2. Create a new layer, set its Blending Mode to Hard Light, then render clouds again until you get something you like.
3. Add some noise by going Filter>Noise>Add Noise with Mono checked and within the range of 20-25.
4. Now go back to the layer that's Blending mode is set to Luminosity, make sure to click it so it's active, then go Filter>Artistic>Plastic Wrap to apply a plastic wrap filter with these settings:
Highlight Strength: 20
Detail: 15
Smoothness: 2
5. Now apply Filter>Sharpen>Sharpen Edges 2 times.
6. This is optional, but it gives an added look to the texture. Apply the Filter>Brush Strokes>Crosshatch filter with settings:
Stroke Length: 5
Sharpness: 6
Strength: 1
And you are done.
Tutorials for other types of Metal Textures:
Check out these tutorials to make There are pages of different techniques to make all kinds of different metal textures, smooth, cracked, brushed, rusted, polished etc etc.
Good Tutorial ~~Metal~~.
#4
Harmony Havoc
-
- Cover Artists
- 712 posts
Girls Love Metallica Best
- Favorite Album:They all kick ass!
Posted 19 August 2005 - 02:36 AM
Trendy Backgrounds
This "Trendy Background" was made by following this TUTORIAL BY Pete Bauer titled “Trendy Background” explains the following steps in detail using screenshots.
1. Open a new document with a white background.
2. Open a second layer filled with black.
3. Open the Noise> Add Noise filter. Use Monochrome , Uniform distribution, and an amount of 300%.
4. Open Pixelate> Crystallize filter with a cell size of 20 (creating a rather uniform distribution of large cells).
5. Open Blur> Motion Blur filter and choose an angle and a distance with an angle of 60 and a distance of 120 pixels.
6. Open the Unsharp Mask filter (the heart of the technique) with an Amount setting of 250% and a Radius of 6. Other settings can be used but keep Threshold set to zero.
7. Use the keyboard shortcut Command-F (Mac) or Control-F (Windows) to re-apply the Unsharp Mask filter with the same settings, but only once.
8. To complete the effect, use a Hue/Saturation adjustment layer (or adjustment), check the Colorize box, and adjust the sliders to create a desired effect.
9. Duplicate the layer by dragging it to the New Layer button.
10. Edit> Transform> Flip Horizontal.
11. Change the upper layer’s blending mode to Pin Light.
12. Apply another Hue/Saturation adjustment with Colorized selected, choosing a contrasting hue. An example of settings to sue is 25/60/-40.
Steps 1 through 4 give the exact values to use on the filters and adjustments, thus the resulting images are the same in the tutorial. The last two adjustment’s variations are up to your preference as you experiment with the sliders. The results will vary.
More Trendy Background Tutorials:
Good Tutorials ~~ Trendy Backgrounds ~~
#5
Harmony Havoc
-
- Cover Artists
- 712 posts
Girls Love Metallica Best
- Favorite Album:They all kick ass!
Posted 19 August 2005 - 02:45 AM
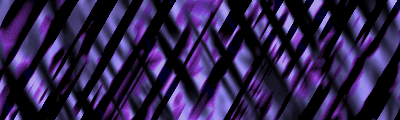
Abstract Backgrounds
Abstract Backgrounds can be created many different ways in Photoshop. As this thread develops several techniques will be presented and discussed, complete with links to tutorials, tips and examples of works created using those techniques. Creating abstract backgrounds can be a time intensive process because it is experimental in nature. Intricate, unique, and detailed designs are the result of much experimentation and application of many different Photoshop functions. When designing abstract backgrounds be creative and willing to experiment (step backwards is only a click away!) It is a good idea to save various stages of your design for future use or to go back and create a completely different looking abstract.
If you have a technique that you�ve found useful in making abstract background please add it to this section. If you need help writing a tutorial, please PM me or one of the moderators. Thanks. Enjoy and have fun!!
Abstract Backgrounds Using Gradient Tools and Filters

This background was made using this TUTORIAL by Jay Arraich explains in great detail, using screenshots, the following steps to create an abstract background using the gradient tools:
1. Open a new Photoshop document with a white background. Rename the background as a layer.
2. Create a second layer and fill it with a color.
3. Click on the gradient tool in the toolbox. In its options bar, choose the angle gradient tool with the opacity set to 50%.
4. Click anywhere in the white document, and drag to the edge of the image. Click again, anywhere in the document and drag to any edge. Keep doing this until something that looks interesting is created.
5. Repeat the process on the colored layer.
6. When an interesting pattern is created, play with the layer�s opacity and blend mode to find a mix that you like between the two layers.
7. Experiment with the filters until a desired effect is created. Help on using the filters can be found Here.
This Pink and Black Abstract background was created using the filters in the following order as shown below. When making your own abstract with filters, experiment with the values on each of the filters, use step backwards if you don�t like what you see, experiment some more, save and move on when a desired effect is created. It is advised to save effects you like as separate files in case you want to come back to them after having distorted it more with other filters. Images of the effects of each filter and a screenshot showing the separation of the individual layers for each step are posted below.
More Abstract Tutorials:
Good Tutorials ~~ Abstract Tutorials ~~
#6
Harmony Havoc
-
- Cover Artists
- 712 posts
Girls Love Metallica Best
- Favorite Album:They all kick ass!
Posted 19 August 2005 - 02:47 AM
Grungy Backgrounds Using Blending Effects
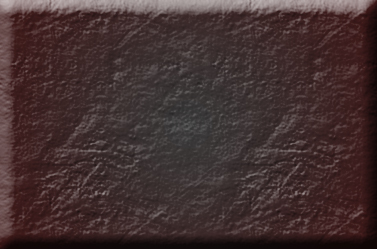
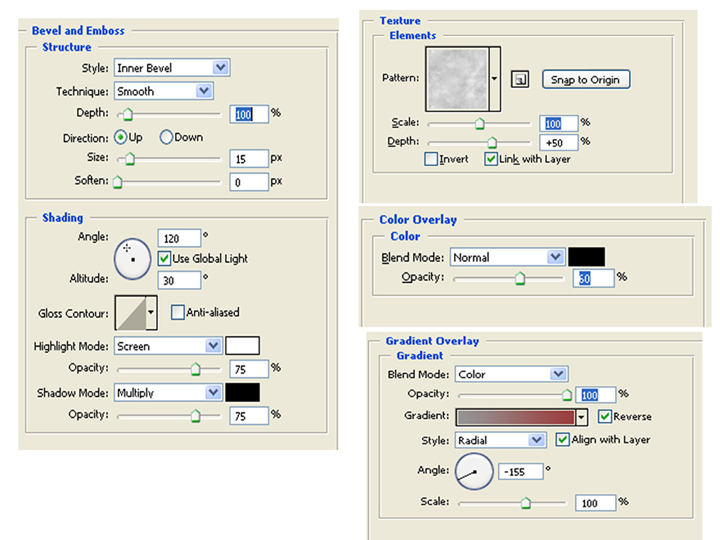
This background was created by Spawn of Cthulhu using the effects found in the Blending Options: Beveled and Emboss, Texture, Color Overlay, and Gradient Overly.
1. Open a new Photoshop document with a black background. Rename the background as a layer.
2. Open the Blending Effects. On the main options screen chose the following: Blend Mode = Normal with an Opacity of 100. Fill Opacity = 0. Check the R, G, and B channels; Nockout = None; check Blend Clipped Layers Together as Group and Transparency Shapes Layers; Blend if Gray left at 0 for both layers.
3. Under Styles, check Beveled and Emboss. Double click to open the options. Chose the following as pictured below: Style = Inner Bevel; Technique = Smooth; Depth = 100; Direction = Up; Size = 15; Soften = 0; Angle = 120; Altitude = 30; Highlight Mode = Screen with an Opacity of 75; and Shadow Mode = Multiply with an Opacity of 75.
4. Under Styles, check the sub category Textures. Double click to open the options. Chose the Pattern and the following options as shown below: Scale = 100; Depth = +50; Check link with layer.
5. Under Styles, check Color Overlay. Double click to open the options. Chose the following as pictured below: Blend mode Normal with an Opacity of 60. Double click the color swatch and choose Black #000000.
6. Under Styles, check Color Overlay. Double click to open the options. Chose the following as pictured below: Blend Mode = Color with an Opacity of 1000. Gradient as shown below; check Reverse; Style = Radial� Check Align with layer; Angle = -155; Scale = 100.
7. Save and add layers to create your design.
Click to see Blending Option Settings
Click to see Blending Option Settings
More Grungy Background Tutorials:
Good Tutorials ~~ Grung Tutorials ~~
#7
Harmony Havoc
-
- Cover Artists
- 712 posts
Girls Love Metallica Best
- Favorite Album:They all kick ass!
Posted 19 August 2005 - 03:19 AM
Marble Textures

This black and blue marble background was created following the directions described this Tutorial by The Velvet Garden. I played around with the brushes, filters, and hues until I found the effect I liked. Be creative when using this tutorial, the marble effects that can be made are endless.
1. Grab your Brush Tool, using the Dune Grass Brush and any color, randomly dab the bottom of your Paint layer as shown in the images in the Tutorial. Basically, this is a really experimental, do-it-yourself tutorial � just grab a different brush and using different colors, paint like you�re back in preschool.
2. Go to Filter>Distort>Ocean Ripple, with both settings to 9. Then do this once more (Ctrl + F).
3. Now, duplicate your Paint layer and name it Contrast. Make sure your Contrast layer is selected in the layers palette, then press Ctrl + T. Right-click the image and select Rotate 180�, then hit Enter. Change your Contrast layer opacity to 50%.
4. Press Ctrl + E to merge the Contrast and Paint layers together. Press Ctrl + U to bring up Hue & Saturation � check the Colorize box, then change the Hue to 13 (or any color you prefer) and Saturation to 30. Hit OK.
5. Create a new layer and name it Reflect. Make sure your Reflect layer is selected in the layers palette, press D, and Ctrl + Backspace to fill the layer in white. Change the layer style to Soft Light.
6. Grab your Eraser Tool, set the brush size to 65 and Flow to 60%. Now randomly criss-cross across your Reflect layer to make the marble look like it has a soft sheen.
Tutorials for other Marble Effects can be found in the links below:
Good Tutorials ~~ Marble ~~
#8
Harmony Havoc
-
- Cover Artists
- 712 posts
Girls Love Metallica Best
- Favorite Album:They all kick ass!
Posted 19 August 2005 - 08:25 PM
Wood Textures

This wooden texture was made by following the directions in this TUTORIAL.
1. Start a new document. Fill the background with color #A58541.
2. Go to Filter->Noise->Add Noise and set:
3. Amount: 60%
Distribution: Gaussian
Monochromatic: Checked
4. Go to Filter->Blur->Motion Blur set:
Angle: 90
Distance: 40
5. Create a new layer.
Press D, to set the foreground + background color to the default. Go to: Filter->Render->Clouds
6. Set the top layer (Clouds layer) 's blending mode to Vivid Light and set the opacity to around 30% to 40%. Merge all the layers together, to do this go to: Layer->Flatten Image.
7. Get rid of the blurred edges so the whole wood texture will blend in better. There are 2 ways of doing this. The easier way is to use the crop tool and crop out the unwanted area, in effect, selecting only the blended wood area. The other way is to stretch the whole image's height so the unwanted area is out of the picture. Either way is fine.
8. Blow up the image a little. Go to Image->Image Size and make the image about 15% larger, so if your image is 700 in height, enter 800 as the new height, as you enter the new height, you will see that the width will also change, leave it as is. Make sure "Constrain Proportion" is checked. Then click ok
9. To make the wood look more realistic, create some knots.
Select the elliptical marquee tool and make a small selection around any dark patch on your wood, select half of the dark patch and half of the normal patch just like my screenshot on the left. Now go to Select->Feather and set radius to about 20 px.
10. Filter->Distort->Wave. You can play around with the settings or you can match mine below. If you don�t like the one formed, just click Randomize so it generate another one for you.
11. You can add more knots by repeating the above step.
After your finished playing around with the knots, go to Filter->Distort->Twirl and set angle to around about 60
12. The wood texture is almost done, because we applied so many filters to it, the wood is now looking rather blurry. Lets go to Filter->Sharpen->Unsharp Mask
I liked the effect of the wood at this point so I did not do the steps that follow this in the tutorial, by doing so you will obtain a finer grain wood texture and pattern.
More Wood Texture Tutorials:
Good Tutorials ~~ Wood Textures ~~
#9
Harmony Havoc
-
- Cover Artists
- 712 posts
Girls Love Metallica Best
- Favorite Album:They all kick ass!
Posted 20 August 2005 - 07:56 AM
Psychedelic ~~ 60’s Tie Dyed ~~ Effect

This psychedelic pattern was created using this TUTORIAL by Pete Bauer:
1. For best results, work with a square document. (You can later use Image Size without the Constrain Proportions option to resize to your required dimensions.)
2. Start with a multi-color gradient
3. Drag from the center of the image to one corner.
4. The Render> Difference Clouds filter has no dialog box because it has no options. Using red (or any color of your choosing) as the foreground color, the filter creates a nice tie-dye background from a diamond Spectrum gradient.
5. Appling a couple more applications of the filter, using the shortcut Command-F (Mac) or Control-F (Windows), can create a more vibrant, psychedelic, or even elegant background.
6. For a different effects experiment with various colors, and gradients. For example using Difference Clouds with a radial gradient creates a very different effect.
The link below shows several variations of this psychedelic pattern created using this tutorial.
Woodstock Menu Art
Other Psychedelic Tutorials:
Psychedelic Spin


1 user(s) are reading this topic
0 members, 1 guests, 0 anonymous users
